In Optometry School you are graded on your written exam’s and for assessments. The assessments take place in the lab (mock optometry exam room) and students are required to preform eye tests on staff or other students. So throughout the semester you are typically assessed on 1 procedure at a time, although final assessments may include multiple procedures and the transitions between them. When I speak of procedures I am talking about all of the possible tests that an optometry doctor can preform.
Today we have SUNY 2013 student Antonio Chirumbolo to talk to us about 2 assessments he recently performed. Antonio has excellent grades to show for his hard work and therefore OptometryStudents.com was eager to get him to write this quality article.
1. Direct Ophthalmoscopy
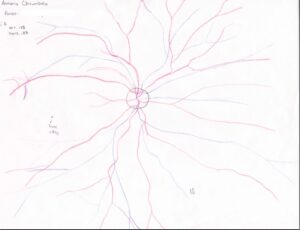
We are given one hour to perform direct O-scope on only the right eye of a classmate. In case you are not familiar with direct ophthalmoscopy, the procedure in very plain terms, allows you to observe the back of a patient’s eye. The objective is to draw a precise rendition of the fundus paying close attention to all veins, arteries and all crossover and branching within 3 disc diopters. In addition, a cup to disc ratio must be estimated, and the macula region as well as presence or absence of a foveal reflex must be rendered and denoted respectively.
To prepare for this assessment, one must practice, practice, practice. One hour sounds like a long time and is a long time, but every eye is different and if you happen to get a particular person with extreme vascularization, or an eye twitch, or even a high myope, the difficulty of this task can increase 10 fold and your hour can seem like 10 minutes.
Even in the event you happen to be rewarded with one of the aforementioned disaster scenarios, a few simple techniques can be utilized to produce a masterpiece worthy of a page in the Netter’s Atlas (Don’t know what that is? You will know all too soon in first year). (Click the picture to see it larger)
Practice makes perfect. However it is not enough just to practice, but you need to develop a technique and stick to it. First and foremost, give the patient a distant target to fixate on. This will help keep the patient’s eye stationary and stable, a necessary must for for a patient with eye spasms. In short, a patient who’s eye spasms spontaneously twitches. Imagine trying to follow veins and arteries from their origin and they suddenly disappear.
Needless to say, things become much more difficult.
Secondly, decide on a method of drawing. I personally drew the cup, the disc, and all artery and vein activity within the cup and disc. I then, starting with the northern hemisphere, followed veins out to three disc diameters. I proceeded to do the same for the southern, western, and eastern hemispheres and in that order. I then followed the same procedure for the arteries, finishing my rendition with the macula area and foveal reflex.
The best advice I can offer is to practice as much as possible and time yourself. Practice as if you were being timed and graded, and when assessment time comes, you will be more than prepared.
On another note, if you happen to get a patient who is a high myope, your field of view will drastically decrease. There is not much you can do about this. You’ll have to work faster and truley talk yourself through the drawing process. Do not be afraid to talk to yourself during the process. In fact, in a situation like this, you should be associating artery and vein position with specific orientations. For example, “Vein leaves cup at 1′ oclock, and is joined by artery branching from 2 o’clock.” In any event, as long as you put the time into practicing, there will not be a situation you can not conquer because chances are, the more you practice, the more unique and challenging scenarios you will encounter!
2. Keratometry
Keratometry measures the power and curvature of the anterior corneal surface of the eye. This assessment required that we take keratometry readings on both eyes of a classmate in 10 minutes. Time was not a major factor, what was most difficult was finding the correct axes for your measurements. In short, keratometry requires that you align two mires (circular kinds of targets) and orient their edges to perfectly overlap.
Although practice makes perfect, this kind of task is partially subjective. What looks perfectly aligned to you may be different than what the doctors grading you perceive. The only bit of advice I can offer is that when you think you may have aligned the mires, rotate the axis wheel both clockwise and counterclockwise to see if a change in axis provides a more precise kind of alignment. This will at the very least prevent you from obtaining an incorrect axis reading. In terms of other techniques, there are not many more words of wisdom to offer. The procedure is actually quite simple; however, it certainly should not be overlooked because complications can certainly arise.
Rest assured, there is some room for error on the grading scale, but it’s a narrow range and you do not want to find yourself outside the range because that will earn you well, zero points!
Next assessment is retinoscopy! This is one you do not want to miss, and is by far the assessment that has resulted in the worst of grades.
Cheers,
Antonio Chirumbolo
Be sure to tune in for the article on retinoscopy and how to gain a competitive edge! We have excellent tips for you guys.
Also please comment. What are you guys learning in optometry school right now?

