Welcome to the first installment of a three-part series describing how I approach low vision exams and device selection! This is a good starting point for students who need a step-wise approach for executing what is often seen as one of the more difficult exams. I find having a systematic approach allows me to gather all the appropriate data and prescribe devices more effectively. Note: The articles here are by no means comprehensive and should not substitute your professional training and judgment!
Part 1: Low Vision Work Up
1. History
Just like any other exams, history is crucial because it drives the rest of the exam. Every patient has a chief complaint or a need. It is up to the clinician to ask appropriate questions and to set a few initial goals for the patient. Don’t be satisfied with a chief complaint of “I’m just here for a low vision exam.” Questions may include:
- Chief complaints
- Patient’s goals: near, intermediate and distance
- Hobbies
- Currently using any devices or wearing glasses?
2. Distance VA
- Use patient’s current glasses
- First attempt Snellen chart (unless VA is known to be poorer than what can be obtained with Snellen chart)
- Alternative charts
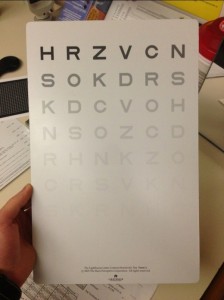
- Feinbloom chart
- Hold chart at 5 or 10 ft for easy conversion to Snellen equivalent
- I always like to start a couple lines above expected VA to build patient’s confidence
- One disadvantage is difficulty with refraction using Feinbloom chart (unless there’s another person holding the chart for you)
- ETDRS
- Easily moveable and able to stand on own without you holding it
- Advantage: more letter options per line
- Good chart when doing refraction
- Feinbloom chart
- Record both central & eccentric VAs
- Attempt eccentric viewing if patient is not already doing so. Record eccentric viewing from patient’s view.
3. Manifest Refraction
- Use current specs Rx as starting point
- May do autorefraction or retinoscopy for starting point if patient doesn’t wear glasses
- Use phoropter if possible
- If patient uses any eccentric viewing, it is HIGHLY recommended to perform trial frame refraction
- Remember just noticeable difference!
- Record both best corrected central and eccentric viewing VAs
- There are many contrast sensitivity tests. One more commonly used is the Mars Letter Contrast Sensitivity.
5. Visual Field
- Test monocularly then binocularly
- Record:
- Horizontal and vertical field
- If there is any scotoma: record size and location
- Note the area with the largest continuous visual field- important for scanning training
- Variety of visual field machines (we are looking for areas of useable vision)
- Arc perimeter
- Goldmann visual field
- Amsler grid (helps locate location of scotoma, but not size of scotoma)
- Humphrey visual field & Octopus may not be the best because of reduced vision
6. Color Vision
- Test monocularly
- Ishihara or Farnsworth D-15
7. Near VA
- Remember to include add over manifest refraction (if patient is presbyopic)
- Test OD/OS/OU
- Test at 40 cm or measure distance patient prefers
- Use good lighting!
- Record distance tested in meters and smallest M notation read
- Example: 0.4m/3M
- Record preferred eye
Acknowledgement:
Thank you Dr. Amy Huddleston, at Veteran’s Affairs Outpatient Center in Jacksonville, Florida, for guidance and tips in low vision examination.


