The Importance of Optical Measurements
Picture this situation: Your small, but thriving, private practice has two opticians, both of whom are busy helping other patients. You walk up to the front desk to see what else is on the books for the afternoon when a patient approaches you and says she has found a pair of glasses and is ready to purchase.

What is going through your mind right now? If you feel terrified, or even nervous, about taking measurements for lens ordering, then this article will help ease some of the anxiety that inexperienced doctors get when it comes to ophthalmic fitting.
Taking accurate frame measurements is a critical element when making a new set of spectacles for a patient. While the optometrist can provide an accurate refraction and glasses prescription to a patient, inaccurate measurements will result in poor acuity (and more!) for the wearer upon dispense.
Pupillary Distance (PD)
The most fundamental measurement is the interpupillary distance, referred to as the pupillary distance, or PD. If this measurement is off by the slightest bit, it can lead to unwanted prism and can leave your patient thinking they didn’t get a good refraction or that the staff doesn’t know what they’re doing. Either way, the goal should be to get it right the first time!
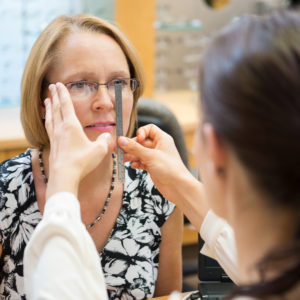
While optometrists may check PDs by hand with a PD stick or use the PD taken during pre-testing, it is important to understand that the PD measurement in a patient’s exam chart should never be one that is referenced for frame measurements. This is because the PD on an auto-refractor, can be skewed, especially if the patient backs out of the chin rest between measurements. It is also just as important to take a more general look at the patient for any asymmetry that may exist, such as a crooked nose, head tilt, vertical displacement of one eye relative to the fellow eye, etc. When it comes to PD measurements, here are a few questions you should consider:
1. Is the patient using these glasses for distance, near, or both?

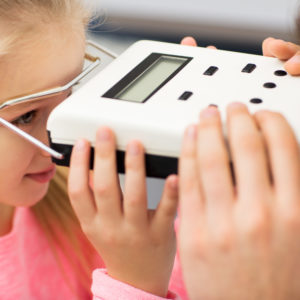
If the patient is using these as reading glasses, you need to adjust your pupillometer to be representative of the distance at which they intend to read. For example, if your patient is getting a pair of single vision reading glasses for general use, you would move the dial on the pupillometer from ∞ (infinity) to 40 cm. This is changing the way the patient converges so the patient is viewing through the optical center of the lens when doing near work. This adjustment when taking pupillary distance prevents any induced prism that you would otherwise get if you were to use the patient’s distance PD instead of near.
2. Why are my measurements so different between the right and left eye?
It is important to consider the method in which you present the pupillometer to the patient. If the pupillometer isn’t properly rested against the patient’s nose, you can get skewed measurements to one side or the other. If you are confident with the way your patient has the instrument rested and centered, then you should be thinking about the possibility of an anatomical asymmetry. If such an asymmetry exists, it is always a good idea to make a note of this in the patient’s chart or on the order sheet to avoid any confusion.
3. Should I take monocular or binocular PDs?
Most opticians have a preference when it comes to taking these measurements, but the consensus for many is to use monocular PDs. However, this doesn’t mean there isn’t a time for binocular PD measurements. Binocular measurements can be used for low-powered, single vision lenses or for lined bifocals/trifocals. With low-power prescriptions, using binocular PDs isn’t a huge risk because it isn’t likely that unwanted prism will be induced. With lined bifocals or trifocals, there is a cosmetic component with the line, so using the binocular measurements will help ensure symmetry with the bifocal. When in doubt, it’s best to use monocular.
4. The patient told me to use the same measurements as last time, should I do it?
This is a business-specific decision. I have worked for businesses that honored this request, but also for some that won’t even entertain the idea. Remember that the higher the prescription, the more the accuracy of the measurements matter. Other considerations to help you in deciding include order history and measurement stability. Whatever the decision, make sure to educate your patient and document, document, document!
Have they been ordering from you for years? Have the patient’s PDs have been exactly the same the last several orders?
QUIZ YOURSELF: With what lens design does using a previous year’s measurement not work? (answer found at the end of the article!)
Helpful tips for using the pupillometer
Get Situated.
Lift the forehead rest bar and allow the patient to grab onto the sides of the instrument like a pair of binoculars. After the nose pads are in a comfortable position, let the bar rest against the patient’s forehead for stability.
Next, ensure the patient is using natural posture before moving anything around (you might need to lean over the table). Some opticians like to have the patient’s elbows rest on the table, too. Remember, the pupillometer is acting as the glasses during this measurement, so the instrument must rest comfortably against the patient’s nose.
If your measurements are more than a couple of millimeters difference between the two eyes, re-do the measurements. I always take monocular measurements twice, and then take a binocular measurement to see if the totals add up to be the same. I like being extra careful, especially with higher prescriptions and progressive wearers.
Get eye-level with your patient.
If you are standing or sitting lower than your patient, the height difference may give you an inaccurate measurement. In other words, make sure you are sitting eye-to-eye with your patient. Move your chair, move the patient’s chair–whatever it takes, just be sure you are taking this measurement while being at eye level.
Check that the patient is orthophoric at the distance being measured.
This is an important consideration, but should not be a problem if you take monocular PDs to begin with. For example, if you know the patient has a left intermittent esotropia (LIET) at distance, then taking a binocular measurement might get you a smaller pupillary distance than what is measured when each eye is looking forward, which is how they are aligned at least part of the time. Bottom line, keep deviations in mind!
Fitting Heights
Remember the old adage: “measure twice, cut [the lens] once?” Before you take any measurements, it is necessary to adjust the frame to ensure a proper measurement, especially if you are going to measure for a lined bifocal or trifocal. After the frame is adjusted, have the patient look around before returning to fixate on you. When they do, make sure to note how they hold their head – do they tend to slouch, or does the patient tend to tilt their head back a little bit? Sometimes you may have them repeat this a couple of times to get an accurate measurement, so recheck as many times as needed to confirm your placement.
Knowing proper segment height placement for each lens type is important. One of the biggest headaches you can encounter with progressive addition lenses (PAL) is putting the segment height too low or too high in a frame that can’t be adjusted, such as a plastic frame that has built-in nose pads.
Quick Mark-Up Review:
- Single Vision: center of pupil
- Progressive Addition Lens (PAL): center of pupil
- Lined Bifocal: lower lid margin
- Lined Trifocal: lower pupil margin
When it comes to fitting single vision or progressive addition lenses (PAL), the center of the pupil is the most important mark. But with lined bifocals, the placement is more subjective and can be difficult to measure on certain patients. Remember to note any vertical displacement of one eye relative to the fellow eye. Some patients will require unequal segment heights due to facial asymmetry because one eye sits lower in the leveled frame than the other. Some patients with an ectropion may appear to need unequal segment heights, but don’t. It is common practice to have the same magnitude of segment height for each eye. But if there is still a difference in seg height after adjusting the frame, noting this on the order sheet helps avoid confusion.
Equally as important as good measurements is educating your patient about the lenses. This is critical if the patient has never worn a multi-focal lens or you are making changes to fitting heights relative to their old glasses.

If a patient presents with lined bifocals or trifocals and is happy with how the lenses function, it is easy enough to look at the fit of the existing lenses and dot close to that same height for the new spectacles. Once you have found the bifocal height, you want to keep in mind pantoscopic tilt guidelines. The optical center (OC) must be adjusted according to the tilt of the frame in order to maintain the lens optic axis with the center of rotation in the eye. In order to accomplish this, the OC must be dropped 1 mm for every 2 degrees of pantoscopic tilt.
Pantoscopic tilt guidelines: for every 2 degrees of pantoscopic tilt induced, the seg height should be lowered by 1 mm.
This concept is less crucial for lower power prescriptions, to the point that some opticians will not even bother taking an OC below +/- 4.00 D of correction. But in higher power prescriptions, this measurement can be crucial to patient satisfaction. For example: if you measure the OC of your patient at 17 mm from the bottom of the frame, and the pantoscopic tilt is 6 degrees, then the OC should be adjusted to 14 mm (17mm – (6/2) = 14 mm).
Having a felt-tip pen is extremely handy for marking lined bifocal and trifocal measurements because it allows the patient to say if they like the height of the line. Even with a high plus prescription, the contrast difference is often enough for a patient to tell when they go to look through the segment. If a plastic (zyl) frame is your patient’s preference, these measurements are even more important to get right because you won’t have nose pads to adjust if there is a segment height problem at dispense.
Progressive lenses can be a bit more difficult to fit (and explain) to a patient, especially if you change to a different lens manufacturer. Front-surface vs. back-surface designs, hard vs. soft corridors, variable vs. fixed, computer/office vs. full-range. The jargon can get overwhelming very quickly. The best approach I’ve found is to draw out a diagram to explain what will be happening and what to expect with various lens designs. If you really want to go all out, you can use the felt pen to mark on the lens and demonstrate the areas that will provide clear images and certain focal lengths.
One final note about fitting heights: in PALs, the lens shape is determined by the manufacturer, and accounts for a light amount of pantoscopic tilt of the frame.
Each office is different in terms of the method of equipment used to take the different measurements. All are perfectly suited for the job, but remember that measurements are the most important aspect of a successful fit. After all, the effort and advanced lens design would be lost without a proper fitting. If the frame doesn’t fit on the patient the same way that it was measured, then the optics will be askew and your patient won’t be happy at dispense.
QUIZ YOURSELF (Answer): When the lens design is for progressive addition lenses! This is because the seg. height is dependent on the depth of the frame as it sits on the patient. So unless the patient is ordering lenses in the exact same frame, these vertical measurements are meaningless from one PAL to the next.
There are more aspects to a well-functioning lens, many of which will be discussed in later parts of the series. Until then, be thinking, “check twice, cut once!”
This article is Part 1 of a 4-part series pertaining to Real-World Applications of Optics and is a collaborative effort by authors Jennifer Krueger and Alex Bennett. Read more:
Part 1: Real-World Applications of Optics: The Importance of Optical Measurements
Part 2: Real-World Applications of Optics: Single Vision Lenses and ANSI Standards
Part 3: Real-World Applications of Optics: Dealing With Compensated Prescriptions
Part 4: Real-World Applications of Optics: Verifying Progressive Addition Lenses (PAL)
Questions or comments? Leave them below!

